
For educational and tech videos, including videos inspired by the blogs on this site, subscribe to my YouTube channel at https://www.youtube.com/watch?v=Ort5oDqRhbQ&list=PLW2f4VwSJ0ZjcXcGsU3Z_Sle8xdinuHZe
Unlock Seamless Access to Your Amazon EC2 Instances Anywhere, Anytime: Introducing AWS CloudShell for Browser-Based Management!
Introduction
Portability means everything to me. Don’t get me wrong. I love using my 16-inch MacBook Pro with a big external monitor when at home or in the office, however there are times when I would easily trade this for being able to work from anywhere.
Have you ever tried using a 16-inch MacBook pro on a train or a bus? Or tried lugging it around with you when going somewhere? Take it from me, it’s not a good experience. This is why I started looking at alternate ways of working, to find a solution that provided me with the portability that I desired, along with the performance that I needed.
To give some context, all my resources are in the AWS Cloud. I just needed a way to access them via my Amazon EC2 bastion server.
In this blog, I will introduce to you to something I have been trialling for the past year. So far, it has met my requirements very well, and if your needs are the same as mine, it might be beneficial to you as well.
Without further ado, let’s dive in!
What is AWS CloudShell?
AWS CloudShell is a browser-based shell that was announced by AWS on 15th December 2020. I remember that it was Google Cloud Platform (GCP) that had first released this feature and soon after, all the major Cloud providers followed.
AWS CloudShell runs on Amazon Linux 2023 and comes pre-installed with common AWS CLI tools. It has native support for Bash, PowerShell and Zsh shells, along with all the commonly used command line utilities that come with these.
Each CloudShell compute environment comes with the following:
- 1 vCPU (virtual central processing unit) per region
- 2 GiB RAM
- 1 GB persistent storage per region. This is retained for up to 120 days after your last CloudShell session. You will receive an email notification a few days prior to the scheduled deletion of your saved data. Saving it from deletion is extremely easy, you just need to re-login to your CloudShell session in that particular region, and it will automatically extend the deletion date by another 120 days.
For more details about the AWS CloudShell compute environment, along with all the software that it comes pre-installed with, please refer to https://docs.aws.amazon.com/cloudshell/latest/userguide/vm-specs.html.
The best part about AWS CloudShell? It is completely free to use! You only pay for any other AWS resources that you use with CloudShell to create and run your applications.
In regards to security, when you run an AWS CloudShell session, it pre-authenticates using the same identity that you have logged into the AWS Management Console with.
But how to I access resources inside my AWS Account?
This is a good question and an important point to keep in mind. AWS CloudShell gives you access to the AWS API via the AWS CLI, however it doesn’t give you access to resources inside your account. So how will it help me?
Let’s ask this question in a different way. How do you access your AWS resources from your local machine?
Your access pattern (depending on the permissions you have) will align to one of the following:
– provisioning and management of resources via the AWS Management Console
– provisioning and management of resources via the AWS CLI
– accessing the provisioned resources either directly or via a bastion server.
The first access pattern is already met if you can access the AWS Management Console.
The second access pattern can be easily met using AWS CloudShell.
It’s the third access pattern, more specifically, accessing the bastion server, that we will cover in this blog.
Prerequisites
Below is a list of requirements that must be in-place to use this solution.
- Your AWS Account must have a publicly accessible bastion server. This will allow you to access your provisioned resources inside your AWS Account. For maximum security, access to the bastion server should be restricted to a small set of IP addresses.
- Based on your setup, your bastion server might either require you to provide a username and password or a private key to login.
In this blog, I will show how to use a private key to login. As a prerequisite, this private key has to be accessible from the CloudShell session. You can either copy/paste it into the session or save it more securely inside your AWS Account.
When saving it inside your AWS Account, you can either use AWS Secrets Manager or Amazon SSM Parameter Store (with SecureString). I will be using the latter. If you choose to use AWS Secrets Manager, just keep in mind that you will incur a small cost.
With those in place, lets proceed.
The Steps
- Using your browser, login to your AWS Management Console and change to your preferred region.
- You can access AWS CloudShell using one of three ways.
- Click on the CloudShell icon at the top right.

- Search for the CloudShell service.

- Click on the CloudShell icon at the bottom left.

- Click on the CloudShell icon at the top right.
- You should now have a CloudShell terminal session running in your browser.

- Let’s start by retrieving the private key that will be used to login to the bastion server.
For this blog, I have stored it in Amazon SSM Parameter Store as a SecureString with the name /bastion/test-ec2-keypair.
Use the following commands to retrieve it and store it in the CloudShell session’s home folder in a file called test-ec2-keypair.pem. The permissions for the file will also be changed.aws ssm get-parameter --name /bastion/test-ec2-keypair --with-decryption --query 'Parameter.Value' --output text > test-ec2-keypair.pem
chmod 400 test-ec2-keypair.pem - Next, use the below command to find the public IP address of your CloudShell session.
curl ipinfo.io/ip
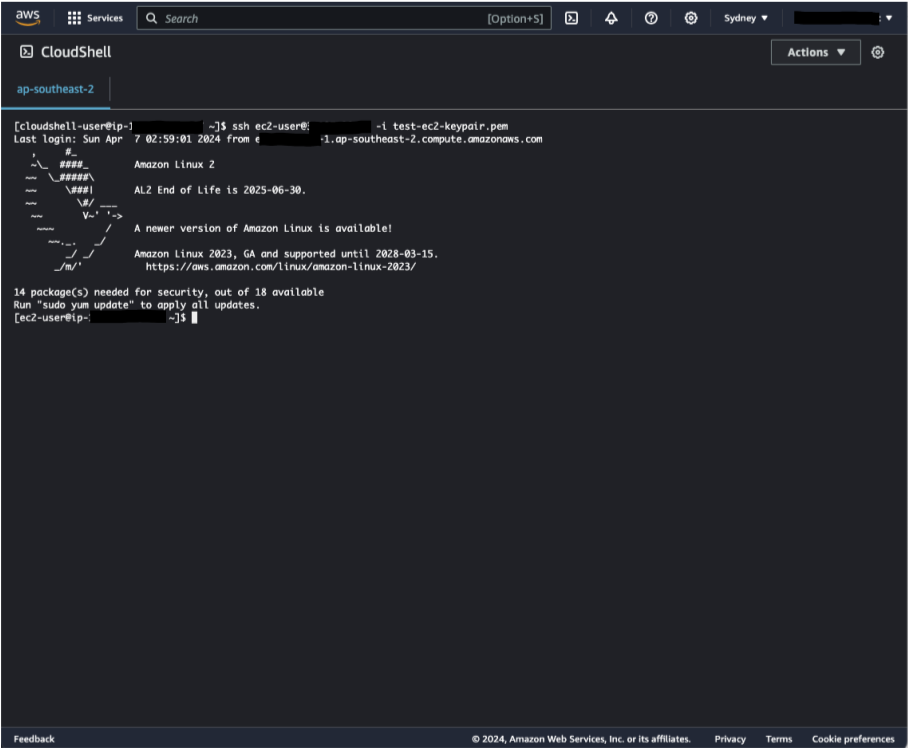
Using the above public IP address, modify the security group attached to your bastion server, to allow ssh connections from your CloudShell session. - With everything in place, use the following command to connect to your bastion server using SSH.
ssh ec2-user@<bastion-publc-ip-address> -i <your-key-pair-filename>
# for example
#ssh ec2-user@1.2.3.4 -i test-ec2-user.pem - You should now be connected to your bastion.
- Once you have disconnected from your bastion server, as a security best practice, use the following command to delete the private key from the CloudShell home folder. You can redownload it the next time using the above-mentioned command.
rm test-ec2-key.pem
So, what did you think of the above? This has helped me immensely in accessing my AWS resources with just a browser on my iPad! It has provided me with easy access to what I need, without having to carry my big MacBook with me!
If you have a similar use case, give it a go, you will be pleasantly surprised!
Till the next time, stay safe!

You must be logged in to post a comment.